

I don’t remember when I bought the Schwinn Exerciser at a garage sale. Two years ago, maybe. I remember strapping it onto the back of the Xtracycle and carrying it home. It cost $2, and the folks selling it seemed delighted to be rid of it. I bought it intending to convert it to power our Country Living Grain Mill, which is kind of a bear to crank by hand. I thought it might take a few weekends to convert.
Well, it did take a few weekends. I just spread them out across two years. Looking at the timestamps on the photos I have of the cog/pulley hub being glued together, I started working on this almost exactly a year ago. I modified the exercycle flywheel and built the cog/pulley hub then, and did the rest last weekend and this weekend.
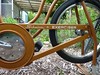
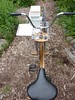
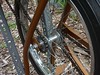
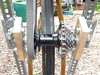
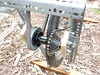
The idea’s pretty simple: pedaling the exercycle turns the flywheel, which has a second cog attached to the non-drive side. That cog turns a chain attached to the cog/pulley hub in front. The pulley of the cog/pulley hub drives a belt, which turns the flywheel of the grain mill.
In practice, nothing lines up quite right. My first attempt at mounting the cog/pulley hub placed it exactly 1/2 a chain link wrong. I tried adding a chain tensioner, but because of the very short chainline, it was just pulling the chain out of gear. A friend suggested cutting out a channel in the angle iron at the top of the frame, so the whole thing could move back and forth to tension the chain. That probably would have worked too, but I ended up making a sliding mount for the dropouts themselves.
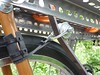
The whole assembly is made of angle iron with pre-cut holes, held together with 1″ bolts, nuts and split washers. It’s like having a huge erector set to play with, one which requires power tools and has sharp edges. (I only cut my knuckle once, and remembered to wear eye protection when cutting metal after the first chip hit me near the eye.) It’s fairly stable in all directions, and while it’s very front-heavy, that’s only a problem when you’re moving it.
There’s a bit of mechanical advantage in the system — one revolution of the pedals turns the mill’s wheel about .9 revolutions. Since the mill operates best at 60RPM, that makes for a nice easy cadence when pedaling. We might add a little cycle computer later to show us how much we’ve used it. So far it’s only been tested on rice, which is pretty easy to grind. I’m curious to see how easy it is to pedal on hard wheat.
I uploaded a bunch of photos to Flickr, and annotated some of them. It should be fairly clear what’s going on, but if you’d like a close-up or explanation of how any particular part or attachment works, let me know.
hi there!
i’m hoping to build one of these bad boys for my town’s local farmers market. i have no idea how to, but i’ll have funding to buy what’s needed and also the determination to actually do it! looks like a lot of fun, and i would be sharing it with the community. if you wouldn’t mind, i would love to talk to you about the details of how to build one that’s high quality like the beauty in your video. in addition, i’m also planning on building a bike-powered blender; if you have experience with that also, that would be great.
thanks!
alex p.
I don’t have any experience with a bike-powered blender, but I understand the Fender Blender is pretty cool: http://www.rockthebike.com/fender-blender-universale/
There are a few good looking Instructables on making one yourself; here’s one: http://www.instructables.com/id/How-to-create-a-human-powered-bike-blender-for-les/
As details on the construction of the grain mill bike, what would you like to know? I can take photos of any of the bits that aren’t clear, too.