Cam and I both have strong memories of getting Mazurkas after high school, her at the Rising Sun fruit stand and me probably from Espresso Express or PCC. They were cheap, tasty, felt just a step up from homemade, and great for eating as you walked home from school. And apparently they were a super local Seattle thing, made by Jessica Reisman at McGraw Street Bakery in Queen Anne.
You can still get “oat bars” at a lot of coffeeshops around town (or at least I assume you can; I haven’t actually been in one in over a year now), but they aren’t the same. I don’t know why we were thinking about them recently, but we were, and we found the recipe. Here’s how I made it tonight:
- 1 1/4 cups all-purpose flour
- 1/4 teaspoon salt
- 1 cup dark brown sugar, firmly packed
- 6 ounces (1 1/2 sticks) cold butter, cut into rough pieces
- 1 3/4 ounces (1/2 cup, firmly packed) shredded coconut
- 3/4 cup old fashioned or quick cooking (not “instant”) rolled oats
- 2 ounces (generous 1/2 cup) walnuts, cut medium fine
- around 1/2 pint of plum jam from last summer’s backyard plums
Put the flour, salt, sugar, and butter in the food processor and blend until the butter’s incorporated and it has the texture of coarse sand. Pastry cutters are for chumps. Transfer to a mixing bowl and mix in the coconut, oats, and walnuts.
Spread about half the mixture in a 9×13 pan — the recipe called for an 8×8 pan, but that made them much too thick, if you ask me, and they took forever to cook. 9×13 makes bars that are a little too thin, maybe, and it means you need more jam, but I think this batch is pretty good. Anyway, put around 3 cups of the mixture in the pan and tamp it down. The recipe calls for putting a sheet of waxed paper over it and pressing it all in with your fingers, but I found that using a slightly smaller pan to tamp it down worked better. The waxed paper won’t come away clean, so I’m not really sure whether it helps or not. Maybe I should try parchment paper next time.
Now start spreading jam around. It’s going to pick up the top layer of the base and make a mess and I don’t see how you’re supposed to be able to do this, honestly. Maybe by warming the jam up so it’s runnier? You want this to be a pretty thin layer, if possible. Maybe some kind of roller would work; I don’t know. The back of a spoon wasn’t the way to go, I can tell you that much.
Once you’ve got a layer of jam over most of it, spread the rest of the flour mixture over the top and tamp it down again. I used the flat bottom of a metal measuring cup for this, since it was handy, and used my fingers in the corners where it didn’t fit.
Now put it in a 325F oven for around 45 minutes. The recipe says the top should be barely firm, but I don’t think mine ever reached a state I’d call “barely firm”. It jiggled and would have run if I’d tilted the pan too much. But if I left it in longer, it felt like it was going to burn. So, before it burns, take it out and let it sit for at least 15 minutes to cool. Ideally, I think you’d let it cool overnight, maybe even pop it in the fridge. It should firm up as it cools. If it doesn’t, well, you’ve got a nice jam crumble; maybe use it as an ice cream topping.
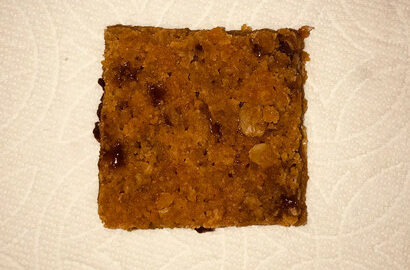
If it worked, though, what you should have is something you can cut into small-ish (2″?) squares that are chewy and not quite cookies but not quite anything else I can think of. Some energy bars come close, but aren’t nearly as tasty. I think of these as walking food; they’d probably be great for picnics or hikes. They’re also great cut straight out of the pan late at night and eaten while writing a blog post.
Update: a batch with applesauce filling also worked, although it made a less dense bar than previous attempts. I don’t know if that’s because I didn’t tamp it down as firmly, because it baked for less time, or if the applesauce had more liquid, or what. It was still delicious, though.
Further update: heating jam in the microwave until it was a little runny and then spreading it with the flat edge of a flexible nylon spatula worked much better than trying to spread it with the back of a spoon out straight out of the fridge.